| Download the zip file
OlafPhys.zip Load the scene
HOlaf_walk.max 
The
enclosed scene provides an elegant half-way
solution to combining HyperMatter and Physique on
the same object. Using this method, there are no
scaling problems or re-initializing to deal with;
although the bulging controls of Physique are
lost, with a little work, they could be
reasonably simulated using HyperMatter. The basic
structure of the scene is that the HyperMatter
solid is animated by means of the Spline Follow
constraint. Under MAX2, simple splines can now
animate their shape. The Spline Follow constraint
binds a Hypermatter part to a Smooth or
Bezier-type spline.
PLEASE NOTE: The splines
used MUST be single, contiguous splines; compound
splines created by attaching simple splines
together will NOT work in this solution.
Unlike
the simple Follow constraint, which only allows
rigid or centre-of-mass rotation following of the
part, the Spline Follow constraint allows the
part to deform with the Spline, allowing far more
sophisticated control, particularly in fields
like facial animation, where fine control of
adjacent parts may be required. The splines are
animated to follow the bones of a Biped figure
using Physique, which allows very accurate and
smooth motion for the HyperMatter object to
follow.
The
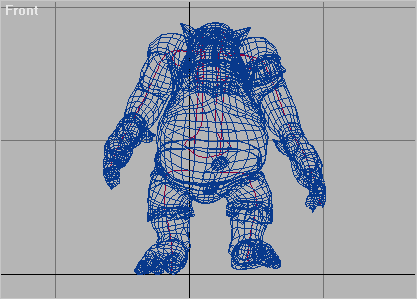
scene consists of the Olaf figure from the
CStudio CD. For speed, we just used the default
demo walk cycle. Because HyperMatter need a
contiguous object to solidify, we first made a
snapshot of all the component objects in the
scene at frame 0, and then attached all the
meshes to form one single mesh object. You must
make sure that the object does not move from its
location; it is very important that the
relationship between the Biped figure and the
character is preserved. The parts we are going to
make will function as the bones of the charcter,
so they are largely subsets of the preset part
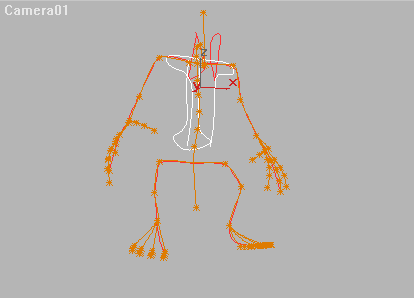
'Interior'. Initially, we created splines that
approximately followed the bones of the Biped;
one for the torso area, one for the legs and
pelvis, one for the head, and one each for the
arms. By applying Physique to each spline in
turn, and flipping up and down the stack between
the modifier and the sub-object vertex editing
panel, the vertices of the spline can be
positioned to exactly follow the Physique links.

After
applying Physique, we attached the torso and leg
splines to the pelvis of the Biped, the head
spline to the neck, and each arm to the shoulder
bones of the Biped. Once the splines are lined up
correctly, Physique must be deleted from the
stack until after the Hypermatter elements are
dealt with.
We
now create the parts of the HyperMatter object.
Obviously, if we are solidifying a detailed, or
slim character, we will have to solidify at a
high enough resolution to allow the limbs to move
freely without stretching or tearing the mesh. A
resolution of 10 was found to be the minimum
level of HyperMatter detail we could get away
with on this particular model. Higher resolutions
will give much more accurate results, but with an
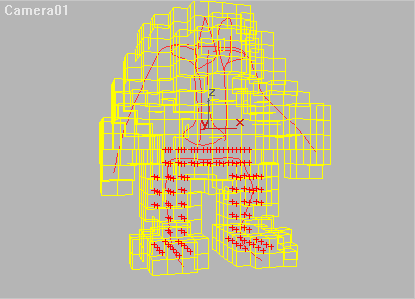
increase in processing time. The part 'Interior'
was chosen, and then vertices deselected to
create the 'bones' of the Hypermatter mesh. The
aim is to get the closest possible fit to the
position of the control splines.

Spline
Follow constraints are then applied to each part,
selcting the appropriate spline when prompted.
The skull part just uses a standard Follow
constraint, as it will not deform or move much
throughout the animation. It's best to just run
the animation a few frames after applying each
Spline Follow constraint to check the part is
aligned correctly; if it is inaccurate, or too
far from the spline, it may pick up influences
from other splines, which can be problematic.
(Physique's influence envelopes in CS R2 will
make this much easier to determine) If the part
is too far from the spline, parts of the mesh may
'jump' at frame 1, denoting that the fit is not
accurate enough. The splines will still be
parented to their respective Biped bones from the
previous Physique application; if you want to
view the model static to check for alignment,
unlink the splines first.
Once
the HyperMatter solid is set up, you should check
that the Substance parameters are adjusted to
allow the mesh to support itself; vigorous
movement further into the scene may result in
unnaturally soft behaviur, or instability in the
worst cases.
So, the HyperMatter solid is set up, and the
Substance is satisfactory; NOW we apply Physique
again to each of the splines in turn. If we apply
it before we apply the Spline Follow constraint,
Hypermatter will refuse to pick the spline at
all.

Physique
will now deform the splines accurately with the
mesh, whilst still allowing Hypermatter to handle
all the soft dynamics. Some extra constraining
functions could be used, either using Fix
Distance to prevent parts from being squashed
together, or non-deforming splines to hold other
parts in place.
We also found that with careful adjustment, this
spline technique can also be used to control
clothing. If you position the splines, and scale
them so that they approximate the OUTSIDE of a
body, ie where clothing would actually contact
the skin, you can effectively hang blouses and
skirts from a Biped with similar ease, adjusting
their substance parameters to behave more like
cloth.
This
method does take away some of the functionality
and control of Physique, but it DOES allow far
more accurate control over a HyperMatter
character than was previously possible, and opens
up many new possibilites for non-Biped driven
characters like snakes or fish, as
Physique can be applied just as easily to any
bone linkage.

 
|
