Download the file
Mousetut.zip (500K) 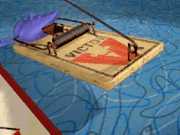 The zip file consists
of the initial scene, the completed scene with
HyperMatter for reference if you get stuck, and
some image files that must be placed in
3DSMAX2/Maps.
NOTE: The scene file
is saved for use in MAX2. It will not work if
loaded into MAX1.2
Load
scene file Mousetrap1.max
Understanding
the problem
The
scene consists of a mousetrap object and assorted
components in position, and a pre-sliced mouse
also ready. All the components of the scene
except the ‘Victor Wood Base' object are
already linked to an invisible object ‘Base
box’.
The mousetrap simply falls to the floor during
the course of the animation, which sounds simple
enough; however, the nature of the scene presents
us with some unusual problems that must be
overcome.
Firstly,
the mousetrap components must behave rigidly, but
still move independently of the mousetrap base.
For example, the trap rod must be free to swing
around, but still remain physically attached to
the hook.
Secondly, we are faced with the logic problem of
HyperMatter solids or parts of solids not being
allowed to Follow other HM objects; this severely
impedes the functioning of the mousetrap as we
envisioned it, as ALL the parts of the mousetrap
must follow the base exactly.
The
only way around this, and similarly in other
linkage-type scenes, is to build the HyperMatter
animation in different stages. We know that
ultimately the base of the mousetrap is the
‘master’ object in the scene; all other
objects initially depend on this object for their
overall position and orientation.
Therefore, we can confidently run the animation
with ONLY the base of the mousetrap solidified.
This will give us exactly the bounce we need,
with minimum time penalty.
This
also allows us to take advantage of the Record
object facility within HyperMatter. Record
objects are standard MAX morph targets that
HyperMatter can generate from its solid objects
on the fly. Once generated, the Record objects
can be manipulated in real time as any other MAX
object, whilst still retaining the original
HyperMatter dynamic information.
NOTE: It is critical
in this animation that once the Record object is
generated, you do not change the orientation of
any of the objects, as they all depend on the
Record object’s orientation to work
correctly.
Animating
the Base - Record Objects
We
will generate the Record object to replicate the
bouncing of the base, and then link all the other
components to that.
1.
Select geometry object Victor Wood Base, and
convert it to a HyperMatter solid, choosing a
resolution of 1 and a fit along the X axis.
2.
Go to the Substance editor, and access the
‘Use Library’ rollup. Select
‘Wood’ from the presets menu.
The Dimension value for this object should be
20.152 for the correct behaviour…you may get
a slight variation of this when you solidify the
object, so change it to the value above.
3.
Go to the Constraints editor. Select the preset
part ‘All’ from the selection sets
field, and apply a Velocity Constraint and a Set
constraint to the part.
4.
Leave the Set constraint to its default lifespan,
and set the Velocity constraint to run from
frames 0 to 10, choosing Whole Part as the
constraint option. Click in the Y checkbox, and
enter a value of 50.
Now
run the animation and check that the box bounces
correctly on the table.
Save
the scene as Mousetrap02.max
We
have the HyperMatter base behaving as we wanted;
now it’s time to generate the Record object.
5.
Leave Sub-object mode if you are currently there,
and with the base solid selected, click
‘Record’ in the Create panel.
6.
Now select the Record object R_Victor Wood Base
and go to the Modify panel.
Select ‘Auto-create Keys’, and when
prompted, select a range of frames 0-300, and a
frame interval of 10. Hit OK, and HyperMatter
will generate the morph targets automatically.
We do not need to generate any further keys, as
the base has completely come to rest by frame
300.
Once
the operation is complete, you can choose either
to hide or delete the HyperMatter solid, as we
will not be using it any further.
Save
the scene as Mousetrap03.max
Linking
HyperMatter Solids to Record Objects
Now
we are going to apply HyperMatter to some of the
other objects in the scene. First, select the
object ‘Base box’, which is simply a
dummy object with a transparent material applied.
This is used as a reference object for linking
all the components of the mousetrap together.
‘Linking’ HyperMatter objects directly
to Record objects with Follow constraints can
also produce unpredictable effects, so we will
use the ‘Base box’ object as an
intermediate step in this case to ensure
fidelity. We need to link this to the Record
object base so that it duplicates exactly its
position and orientation.
7.
Select Base box, link it to the object R_Victor
Wood Base, and play the animation again.
Now
all the components of the mousetrap follow the
base, and duplicate its bouncing.
8.
Select the mouse object, and solidify it at a
resolution of 2, and a fit along X.
9.
Set the Dimension value to 12.961 and choose
‘Hard Ball’ from the library of presets
substances.
10.
Now go to the constraints editor, and select the
mesh points enclosing the base of the mouse (see
picture).
11.
Name the part ‘base’ or similar, and
apply a default Follow constraint to it, from
frames 30-950, picking the ‘Base box’
object as the follow object.
12.
Now go to the Track View and set the lifespan of
the mouse to begin at Frame 30.
NOTE: As we have
keyframed the initial rotation of the trap rod
from 0-40, we do not need the object active until
this point; in fact, all the HyperMatter objects
should be set to have a lifespan beginning at
frame 30 to speed things up a little.
Run
the animation again, and the mouse will stay with
the base, responding to the keyframe animation
and deforming upon collision with the HyperMatter
walls (hidden).
Save
the scene as Mousetrap04.max
13.
Now select the object Coil Box, and solidify it
at resolution 3, X fit.
This is another transparent object that we will
substitute for the wire coil at the HyperMatter
level to save on calculation, as it will be
involved in collisions with the trap rod.
14.
Go to the Constraints editor, and apply three
constraints to the preset part ‘All’,
Set, Follow and Collide.
15.
Select the object ‘Victor Wire Coil’ as
the follow object, from frames 30-950. Set the
collide constraint to begin at frame 45.
16.
Set the dimension value in the Substance editor
to 10.651. Set the lifespan to begin at frame 30.
Using
Follow Constraints for Advanced Control
The
next part of the animation is a little trickier
to understand. The trap rod has been rotationally
keyframed from frames 0-40 to initiate its
downward bouncing. We want the rod to hit the
Coil box, and rattle up and down until it comes
to rest. We also need the rod to freely rotate
around its support hook, but not roll over
sideways.
A
standard Follow constraint is used initially to
keep the rod aligned.
17.
Select the trap rod, and solidify it using the
MAX option button at a resolution of 24.
18.
Now go to the Substance editor and set the
Dimension value to 7.105, Damping to 1.5,
Incompress to 2.0 and Friction to 0.5. Leave the
other components as the defaults.
Change the sampling option from Automatic to
Manual, and leave at 1.
19.
Go the Constraints editor and select the preset
part ‘All’. Apply a Set constraint to
this part from frames 30-950. This ensures that
the rod stays rigid throughout the animation. Now
select HyperMatter mesh points around the trap
rod pivot point (see picture).
20.
Name the part and apply a Follow constraint to it
from frames 30-950, and choose Whole Part as the
follow option.
21.
Select Victor Hoop 3 as the follow object. This
will allow the rod to freely rotate around its
pivot whilst still ultimately following the base.
22.
Apply a Collide constraint to the Exterior of the
trap rod, beginning again at frame 45. Set the
lifespan of the trap rod to begin at frame 30.
To make the animation
play quicker, only select a subset of the part
Exterior around the point of collision (see
picture), as calculations are wasted if points
not actually colliding are included.
 NOTE: Make
sure that the two Collide constraints we have
applied, to the trap rod and the coil box, are in
the same collision domain, otherwise the
constraints will have no effect. NOTE: Make
sure that the two Collide constraints we have
applied, to the trap rod and the coil box, are in
the same collision domain, otherwise the
constraints will have no effect.
Save
the scene as Mousetrap05.max
Now
play the animation again, and observe the
behaviour of the trap rod.
Varying
Follow Options and Ordering Issues
The
trap rod now collides correctly with the coil box
as the mousetrap bounces around; however, as the
animation plays, the trap rod gradually begins to
roll over on its side, reducing the realism of
the linkage we have created.
To prevent the trap rod from rolling over, whilst
still rotating freely around the wire hoop, we
need to apply ANOTHER Follow constraint to it.
This time select the area of HM mesh completely
enclosing the loop of the trap rod (see picture)
and name the part.
23.
Apply another Follow constraint to this part. To
prevent the rod from rolling, we need to
constrain it only along its X axis.
24.
Uncheck the Y and Z components of the Follow
constraint, making sure that the follow option is
set to Each Point. This ensures that the
constraint only affects the solid along its X
axis of rotation, whilst still allowing it to
rotate freely under the conditions of the
previous Follow constraint.
NOTE: The ordering of
constraints at this point is crucial. The new
Follow constraint must be moved one place up the
list, above the Collide constraint. This ensures
that the two Follow constraints are evaluated one
after another, reducing the likelihood of
unpredictability caused by the collision of the
trap rod.
The two Follow constraints could be usefully
considered to be one ‘expanded’
constraint in this context; this is a very useful
way of adding more sophisticated controls over
dynamic situations.
 Save the scene as
Mousetrap06.max Save the scene as
Mousetrap06.max
Play
the animation again, and the trap rod should
correctly bounce up and down against the coil box
until the mousetrap eventually comes to rest.
You
could separate each collision into a unique
collision domain; this will speed the whole
process up, as HyperMatter will only calculate
for collisions when they are actually happening.
If you are using a fairly quick machine however,
it is probably unimportant for an animation of
this type.


|