| Procedure The Spline
Follow Constraint, new to HyperMatter 1.1 takes
advantage of MAX2’s ability to animate
individual vertices of a spline. It works in a
similar way to the normal Follow constraint,
except instead of following the pivot point of a
named MAX object, the designated HyperMatter part
follows the curve of the spline, allowing very
intricate and controlled movement.
The
following tutorial will show you a very simple
demonstration of how the constraint can be used.
Load
Scene file spdemo02.max
The
scene consists of a HyperMattered cylinder,
solidified at a resolution of 4, with an X fit.
It is standing on a HyperMatter Walls object,
with a simple spline running down the centre. 
NOTE: For the
spline Follow Constraint to work correctly,
certain rules must be observed:
- The
spline must only possess vertices of the
types ‘Smooth’ or
‘Bezier’. ‘Corner’
vertices will not work with this
constraint.
- The
spline must be created, and then animated
directly in the Modify panel, using
‘Sub-Object / Vertex’ DO NOT
apply an Edit Spline modifier to the
spline; this will disable the Spline
Follow constraint.
Hit
Play, and watch the animation. You will notice
that the cylinder begins to collapse for a while,
until it steadies, and then slowly uncompresses
again. At the same time, the spline begins to
undulate from side to side in a serpent-like
motion. Keys were entered previously to set up
this movement, using Sub-Object / Vertex in the
Modify panel.
Now
return to Frame 0, select the cylinder, and
select Sub-Object HyperMatter. Now make a part of
the HyperMatter mesh, consisting of the very
centre line of points only, from top to bottom,
so that the line corresponds to the spline at
rest. Name the part, and hit the Spline Follow
button. Select the spline from the ‘Select
by Name’ dropdown and the new constraint
will appear in the list. Select the constraint,
and type 130 for the end point.
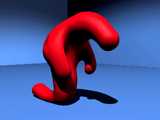
 Now hit Play,
and the cylinder will undulate with the spline,
no longer collapsing on itself as it is supported
completely down its centre. At Frame 130, the
constraint ends, and the cylinder collapses onto
the floor. Save the scene as
‘spdemo03.max’ Now hit Play,
and the cylinder will undulate with the spline,
no longer collapsing on itself as it is supported
completely down its centre. At Frame 130, the
constraint ends, and the cylinder collapses onto
the floor. Save the scene as
‘spdemo03.max’
Try
moving the spline to different locations before
re-playing the animation, to see the difference
in movement. You will probably have to stiffen
the HyperMatter object as it is currently very
soft, and will be thrown around quite violently
if you move the spline too far.
 The Spline Follow
constraint has many and varied uses. At it’s
most complex, it could be used for character
animation that does not rely on rigid bone-like
links to create the movement, say slugs, or
octopuses. It could also be used to crate facial
animation, so that for instance, you could use
splines to raise a character’s eyebrow, or
move lips. The possibilities are endless, so
explore and create! The Spline Follow
constraint has many and varied uses. At it’s
most complex, it could be used for character
animation that does not rely on rigid bone-like
links to create the movement, say slugs, or
octopuses. It could also be used to crate facial
animation, so that for instance, you could use
splines to raise a character’s eyebrow, or
move lips. The possibilities are endless, so
explore and create!
|