| Download Sack.zip This zip file
contains two MAX files; the original key-framed
scene, and the finished scene with HyperMatter
included. The final scene is intended for
reference if you get stuck. Copy the maps,
Flour.tif, and Dirtgray.jpg into your Maps
folder. The latter may be already installed, as
it is a standard MAX map. 
This
tutorial will demonstrate how easily HyperMatter
can be used to impart natural believable
character motion to an inanimate Max object.
Although
the object you are animating will consist of one
HyperMatter Object Level Solid, you will be
applying Constraints to individual parts of the
Solid, which to gives the impression of an
underlying articulated structure thereby bringing
the object to life.
View
the Animation – part I
1.
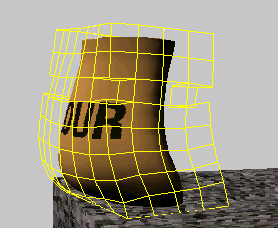
Load and play the file CH7_SACK.AVI and play the
animation.
A
bulging sack of flour springs into life, and
walks down a path to a deep drop. It pauses at
the edge, steadies itself, and then leaps over
the edge.
The
scene uses multiple Constraints to impart a
complicated motion to an inanimate object,
showing how HyperMatter can be used to produce an
animation which would otherwise only be
achievable through a more complex skeletal
animation of an articulated structure.
2.
Load the file CH7_SAC1.MAX and play the
animation.
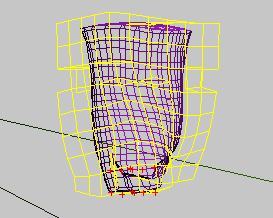
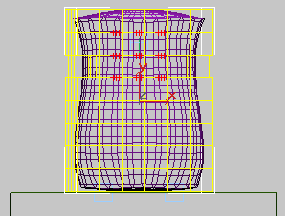
A
HyperMatter Control Object H_Sack with an Object
Level Solid SO_Sack_1 is situated on top of a
standard Max Box object Box01. Four Dummy Helper
objects are in place, one of which, ChestDummy
has a Path Controller assigned to its position.
This will serves as a guide rail to keep the sack
supported throughout its animation.
The
helper objects LeftDummy and RightDummy have been
keyframed to represent footsteps. The sack has
several Parts already created, and you will use
two of these to make the sack walk.
Apply
the Follow Constraints – part II 
1.
Select H_Sack.
2.
Go to the Modify Panel, select SubObject:
HyperMatter and Constraints.
3.
Select the Part LFoot from the Named Selections
dropdown.
4.
Click Follow.
5.
Select the helper object LeftDummy as the Follow
object.
6.
Highlight the Constraint in the list.
7.
Set the Lifespan of the Constraint to Start: 15
and End: 300.
8.
Check Apply to Each Point.
This
will ensure that the foot follows exactly the
animation of the helper object
9.
Repeat steps 5 to 10 for the Part RFoot,
selecting RightDummy as the Follow object and
setting the lifespan of the Constraint to Start:
30, End: 300.
10.
Play the animation
Editing
the Substance Properties – part III
You
will notice that although the sack begins to
walk, with the feet following the helper objects
accurately, the sack soon begins to twist and
overbalance. This is because its Substance
properties are not stiff enough to keep it
upright. We are now going to edit the Substance
Properties of SO_Sack_1 to make it stiffer,
taking care not to make it too stiff as you could
then lose the dragging motion that would be
typical of a heavy object.
1.
Click Substance Editor.
2.
In the Properties rollout change Elasticity and
Damping to 2.0.
3.
Increase Friction to 1.25.
4.
Save the file as CH7_SAC2.MAX.
The
third helper object, ChestDummy, is has a Path
Controller assigned to it and represents the
approximate position of the upper part of the
sack as it walks along. We will attach another
Follow Constraint to the sack in order that it
follows this path
5.
Select the Part named Chest from the Named
Selections dropdown. 
6.
Click Constraints from the HyperMatter Control
rollout.
The
Constraints rollout appears
7.
Click Follow.
8.
Select ChestDummy as the Follow object.
The
entry FOL [Chest] -> ChestDummy will appear at
the end of the Constraints list.
9.
Set the Lifespan of the Constraint to Start:15,
End: 300.
10.
Play the animation.
The
sack now walks much more convincingly, remaining
upright as it does. At this stage you should
experiment with the other Follow Constraint
options, Apply to Whole Part, on the different
Parts, one at a time, to see the difference in
movement that results. You will find that the
difference is most pronounced when the Chest Part
is changed, as it will tend to swing around the
helper object as it follows it.
11.
Reset all the Follow Constraints to Apply to
Whole Part.
12.
Save the file as CH7_SAC3.MAX.
13.
Play the animation.
The
sack walks to the end of the box, and pauses.
By
the time the Follow Constraints all end, the sack
has stabilized, and is standing fairly still.
However, once they release control, the sack will
attempt to return to its original, undeformed
state. And furthermore it will be displaced by
the recoil it receives from the earlier
Constraints ending. As you want the sack to leap
off the edge, you need to apply further
Constraints to accomplish this.
Creating
the Jump – part IV 
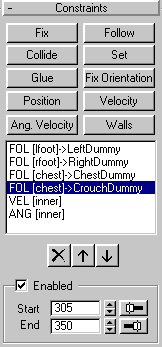
The
helper object CrouchDummy has a small animated
trajectory, which is used to pull the sack’s
top half down towards the ground, and peer over
the edge.
1.
Select the Part named Chest.
2.
Click Follow.
3.
Select CrouchDummy as the Follow object.
4.
Select the Constraint from the list.
5.
Set the Lifespan of the Constraint to Start: 305,
End: 350.
6.
Be sure the Follow option is set to Apply to Each
Point.
Once
the sack is crouched and ready to jump, you will
release the Chest Part from the Follow
Constraint, and apply a Velocity Constraint to
make it jump over the edge.
Applying
a Velocity Constraint – part V
1.
Select the Part named Inner.
2.
Click Velocity.
3.
Select the Velocity Constraint from the
Constraints list.
4.
Set the Lifespan to Start: 350, End: 375.
5.
Set the Constraint to Relative to Start Time.
6.
Enter values of -150 in the Y field, and 50 in
the Z field.
7.
Play the animation.
The
sack now leaps forwards, but almost immediately
starts performing a somersault. We need to apply
a rotational force in the opposite direction to
the sacks’ rotation, but only enough to keep
the sack upright as it jumps.
Applying
an Angular Velocity Constraint – VI 
1.
Select the Part named Inner.
2.
Click Angular Velocity.
3.
Select the Constraint from the list.
4.
Set the Lifespan to Start: 350, End: 361.
5.
Set the Constraint to Relative to Start Time.
6.
Enter values of -1.05 in the X field, -0.15 in
the Y field and -0.1 in the Z field.
7.
Save the file as CH7_SAC4.MAX.
8.
Play the animation
We
do not need to set large values for this
Constraint, only enough to counteract the roll
that the sack naturally picks up by virtue of the
velocity given to it.
Animating
the Walls Object -VII
The
sack now jumps perfectly over the edge. However,
as soon as it returns to ground level although it
should fall over the edge it actually bounces up
again. This is because you have a hidden Walls
object , H_Wall01, in place to allow the sack to
walk along the ground up to this point.
The
Walls Object needs to be in place until the sack
jumps in the air. We do not need it after this,
so you can animate it out of the way, before the
sack hits it again, spoiling the illusion.
1.
Go to frame 390.
2.
Unhide H_Wall01.
3.
Click the MAX Animate button.
4.
Drag the Walls object vertically down, until
it’s base is level with Box01.
5.
Go to the Track View.
6.
Expand the tracks H_Wall01 to its position
controller.
7.
Drag the first keyframe to frame 370.
This
ensures that the Walls do not move until the sack
is clear of the ground. By the time the sack
reaches ground level, the Walls have gone, and
the sack jumps cleanly over the edge.
NOTE: This could also
have been achieved using a Walls Constraint with
a Lifespan timed to disable the constraint at the
right time.
8.
Save the file as CH_SAC5.MAX
9.
Play the animation.

 
|