| Download Skijump.zip
(700K). This zip file contains
two MAX files; the original key-framed scene, and
the finished scene with HyperMatter included. The
final scene is intended for reference if you get
stuck. Copy the four maps, tree.avi,
Brickbmp.gif, Bricktan.gif and Cedfence.jpg into
your Maps folder. The last three may be already
installed, as they are standard MAX maps. 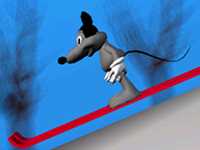
In
this tutorial you are going to build a complex
animation starting with just some standard MAX
objects and simple keyframes. This animation
relies quite heavily on the use of Constraints.
Unlike normal keyframed objects, HyperMatter
objects simulate real materials and have a life
of their own. If you push them they want to move.
If you throw them at the wall they will bounce
off. If you pick them up and let go they will
drop. The process of interacting with a
HyperMatter object that is doing its own thing in
this way is known as constraining it. As the name
suggests it is a less rigid form of control than
keyframes.
The
purpose of this tutorial is to familiarize you
with a number of the more frequently used
Constraints and show how they may be usefully
applied to create elegant and sophisticated
animations very quickly.
The
scene consists of a mouse on skis, keyframed to
jump into shot from the right and land on a
ski-slope. The mouse’s skis are linked to
it. After he lands, he (apparently) skis down the
slope. A bit later the camera pulls back to
reveal the mouse actually stationary and upright,
in front of a large back-projection screen. The
impression of the mouse traveling downhill is
created by the camera tilt. The animation ends as
the mouse looks towards the camera, the stage
lighting and back-projection switch off, and he
is left alone, on an empty stage.
Constraints
are used throughout the animation to add various
effects that would be extremely hard to do
otherwise. If you use Constraints with Sub-Object
level Solids you can add these effects to the
animation without interfering with the
object’s overall motion.
Load
the scene CH7_SKI1.MAX.
Sub-Object
Solidify the Mouse – part I
As
you want to keyframe the initial movements of the
mouse, but keep it relatively stationary
throughout the animation, you will use
HyperMatter to create Sub-Object Solids, allowing
greater control over the mouse’s local
deformation. By using HyperMatter Constraints,
you can enhance the underlying keyframe animation
of the mouse giving it greater freedom as it
reacts to the motion. You will use three
Constraints: Follow, Angular Velocity, and Fix
Orientation, which will be used to pull and twist
the object over time and then hold it steady.
3.
In the Front viewport select Mouse and
SecondNature from the Object Type drop-down list.
4.
Click HyperMatter.
The
HyperMatter Control Object H_Mouse is created.
5.
Go to the Modify Panel and click Sub-Object:
Geometry from the Modifier Stack rollout.
6.
Region Select the top half of H_Mouse including
hands and tail as shown below. Take care to
select correctly otherwise the resulting
animation may be affected.
7.
Click Automatic Solidify.
The
HyperMatter Solid Object SO_Mouse_1 is created.
8.
Click Solidify Sub-Object..
9.
Set the Resolution to 6.
10.
Click Fit Direction Z.
11.
Save the scene as CH7_SKI2.MAX.
The
reason for choosing this fit direction is that
the automatic Fix Constraint’s Join Part is
created highest up the body for greater
stability. The priority in choosing the fit
direction is to ensure the best possible movement
for the geometry you are using.
NOTE: A low resolution
Solid or Sub-object Solid will generally be
faster and appear stiffer than one with higher
resolution. In many cases using a low resolution
Solid Object is much simpler and computationally
less expensive option than trying to stiffen a
high resolution Solid by increasing its Damping
and Elasticity. A common mistake many beginners
to HyperMatter make is to create Solids that have
too high a resolution for the task required.
Obviously, if you are aiming for an animation of
a close-up of complex surfaces colliding, you
would need to ensure the closest possible fit of
the Solid Object around the geometry, but in
general, if an object is freely moving, with
relatively simple collisions, then the resolution
of the Solid Object can often be set to
surprisingly low levels to obtain the required
results.
12.
Play the animation.
You
will notice that the Solid Object now responds to
the underlying keyframe animation, but is
extremely soft and collapses at the boundary
between the Solidified and unSolidified parts.
Note: As a general
rule, if you want an object to move quickly, you
will need to increase Elasticity and Damping.
This stiffens an object. If you want an object to
stay soft and move quickly, then you will need to
increase the Sampling Rate, particularly with
Sub-Object Solids where you need it to still
appear part of the remaining geometry. Setting
Substance Properties that are too soft will cause
a Sub-Object Solid to deform too much and appear
to move away from the original object. Any
substances used must be stiff enough to maintain
this relationship.
By
default, HyperMatter applies a default downward
Force (-Z) to all newly created Solid Objects. As
gravity does not play a great part in this
animation and is partly responsible for the
object collapsing you will reduce the Z force
from its default value. You want to reduce the
downward force on the body, but no gravity at all
would be unrealistic.
13.
Select Sub-Object HyperMatter and Forces.
14.
Change Force Z to -50.
Edit
the Substance Properties – part II 
To
keep the mouse upright you need to increase its
Elasticity and Incompressibility to ensure that
it maintains its shape under stress, and increase
its Damping to reduce unnecessary wobble.
Elasticity and Damping often work very much in
tandem, and for this reason HyperMatter allows
you to lock their values together. You will now
edit the Substance Properties to stiffen the
mouse’s body.
Note: For more
information on Substances see Chapter 5,
Substances.
1.
Click Substance Editor.
The
Substance Properties rollout appears.
2.
Change both Elasticity and Damping from 1 to 5.
3.
Change Incompressibility to 1.5.
4.
Play the animation.
You
will notice that the mouse is much more stable on
landing and, due to it’s increased
Elasticity and Damping, is now quite capable of
supporting itself under the stresses produced by
the underlying keyframed animation.
To
add more realism to the illusion of downward
motion, it would be a good idea to create the
effect of an upward wind parallel to the slope.
Although only the tail of the mouse will be
significantly deflected by the wind, as the main
portion of the body is quite heavily Constrained,
it will serve to cushion any excessive forward
movement, and introduce an element of randomness
into the descent.
To
do this you will add another force, perpendicular
to the Z gravity force you have already set.
Remember the downward effect is only suggested by
the camera angle.
5.
Click Forces.
The
Forces rollout appears.
5.
Change X Force to 50.
6.
Play the animation.
The
mouse’s Solid Object now responds to the
horizontal force, giving the impression of wind
resistance on landing, and, by implication,
downward motion This is just what you were
seeking. To give the impression that it is
traveling down a ski-slope, the mouse needs to
settle down into a leaning position as if
balanced for downhill skiing.
You
will notice that as it lands, after an initial
backward swing, the solidified portion of the
mouse rotates forward again, towards a dummy
helper object Dummy01 which already has been
animated.
This
dummy object will be used as a brake to slow down
the mouse’s response to the keyframed
animation and also function as a guide to control
it’s motion from this point.
Add
a Follow Constraint – part III 
1.
Region select the points of SO_Mouse_1
surrounding the top half of the head.
2.
Create a Part named skull by typing the name into
the Named Selections drop-down.
3.
Click Constraints.
4.
Click Follow to add a Follow Constraint.
The
prompt line will change to read Click to select
Follow Object. You must now select the Follow
Object by either clicking the Dummy01 object in a
viewport or selecting it by name.
5.
Select Dummy01 as the follow object
The
entry FOL [skull] -> Dummy01 appears in the
Constraints List.
6.
Select the Follow Constraint by clicking in the
list
The
Constraint Lifespan controls become active and
the Follow rollout appears
NOTE:You may have to
scroll the panel to view this rollout
7.
Set the Lifespan to Start: 35 and End: 370.
8.
From the bottom of the Follow rollout select the
Whole Part radio button in the Apply To box at
the bottom.
The
aim is to transfer control with a minimum of
disturbance from one Constraint to another.
Selecting Each Point would be unrealistic in this
case, as there would be a visible jolt when the
Constraint came into effect. Selecting Whole Part
simply constrains the Part’s center of mass
leaving the remainder of the Part to move more
freely.
NOTE: For more
information on Constraints see Chapter 6,
Constraints and Forces.
TIP: To allow
Constraints you’ve just created to take
effect at the current frame don’t forget to
click Refresh.
The
mouse now stops its motion near the dummy object
when the Constraint becomes active. The motion is
still a little jerky, but will do for now. Later
you will use the forces to refine the motion
further. The dummy object has a small keyframed
animation that will slowly draw the mouse into a
gentle leaning position and gradually pull him
back up again as the scene reveals itself.
9.
Play the animation.
The
mouse now behaves in a more steady and
predictable way, but lacks personality. Using
another simple Constraint, you will animate an
individual part of the mouse’s body, namely
the head. At frame 275, you want the head to
slowly turn towards the camera and acknowledge
that the skiing illusion has failed, taking 60
frames to do so.
Add
an Angular Velocity Constraint – part IV 
1.
Region Select the points of SO_Mouse_1 that
enclose the head.
2.
Create a Part named Head by entering the name in
the Named Selections drop-down.
3.
Click Constraints.
The
Constraints rollout appears.
4.
Click Ang. Velocity to add an Angular Velocity
Constraint
5.
Highlight the new Constraint in the list.
6.
Change its Lifespan to Start: 275, End: 335.
7.
Check the Z box and enter a value of 0.5.
Add
a Fix Orientation Constraint – part V
You
will now stop the movement of the head once
it’s got into the desired position. You want
to achieve this, as with the other operations,
with the minimum of interference to the natural
motion of the character. To do this you will add
a Fix Orientation Constraint to the head to start
at the time that the Angular Velocity Constraint
ends.
1.
With the Part Head still selected, click Fix
Orientation to add the Constraint.
2.
Highlight the Constraint in the list.
3.
Change its Lifespan to Start: 335 and End: at the
end of the animation.
5.
Save the scene as CH7_SKI3.MAX.
This
will keep the head in position once the Angular
Velocity Constraint has reached the end of its
Lifespan. The Follow Constraint has to give up
priority to the Angular Velocity Constraint, due
to their ordering. But the mouse should follow
and then turn.
Reorder
the Constraints – part VI
You
will now change the order in which the
Constraints are applied. You will do this by
simply changing their order in the Constraints
list. For more information on Constraint
evaluation, see Chapter 6, Constraints and Forces
– Constraints Evaluation.
1.
Select the Angular Velocity Constraint.
2.
Click Move Constraint Up.
The
Angular Velocity Constraint will now be evaluated
first.
Animate
the Force in the Track View – part VII
1.
Open a Track View and expand the tracks off
H_Mouse.
2.
Select the Forces X track and click Function
Curves from the Track View toolbar.
3.
Add some keys to produce a curve similar to the
one illustrated. This does not have to be very
exact.
You
can refine the animation by editing this curve.
Be aware that deviating too far from the curve
suggested or using different forces may result in
a completely different animation.
Tip: The key thing to
remember is to maintain a balance, always make
sure the Forces and Substances involved in
HyperMatter animation do not overwhelm each
other, but work in harmony.
You
have now completed a fairly complex animation
using HyperMatter. You have learned how to use
HyperMatter to enhance an existing keyframed
animation. You have also learned how to apply a
variety of HyperMatter Constraints to
‘sculpt’ the motion of HyperMatter
object while allowing it retain its natural look.
This
is where the true power of HyperMatter lies. Not
only are you able to create animations that are
completely plausible, just by virtue of the
accuracy of the dynamics involved, but you are
able to retain complete control over these
objects and their movement to allow you to modify
it at any time.


|