| Download Rasta.zip
(240K) Place the
scene H_Dreads03.max in your MAX/Scenes folder,
and the bitmaps Cloud2.jpg and Spliff.tif in your
MAX/Maps folder. This is a very simple
demonstration of how a Follow Constraint and some
simple Sub-Object level use of HyperMatter can
transform a mundane scene into something
astonishingly realistic, and which would be
incredibly difficult to create using normal
animation methods.
The scene
consists of a cartoon Rasta head, which has been
keyframed to rotate and nod up and down. The
dreadlocks are a separate MAX object, that has
been Solidified at Object level with HyperMatter,
and attached to the head by use of the Follow
Constraint.
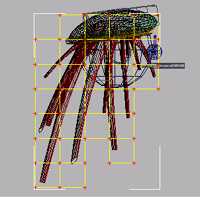
This
is similar to the linking tool in MAX with the
advantage of either rigid or smooth following,
for highly realistic behaviour. We selected a
part of the HyperMatter mesh, using the normal
MAX Sub-Object selection tools, named it, and
applied the Follow Constraint to it, choosing the
head as the object we want it to follow.
Using
the default substances initially, play the
animation. You can see that the dreadlocks swing
round with the head, although they are very soft
and stretchy. You need to modify the Substance
properties to enable the dreadlocks to respond to
the stresses of the animation better. Remember,
the substances you make have REAL properties, so
if they are undergoing severe movements, at high
speeds, they need to be strong enough to deal
with them.
Go
to the Substances panel, and change Dimension to
8, Elasticity and Incompressibility to 1.5, and
Damping to 3.
|
Now play the animation
again, and you will see that the dreadlocks now
swing around much more convincingly, supporting
their own weight, and still taking all their
motion from the simple keyframes we originally
set up.
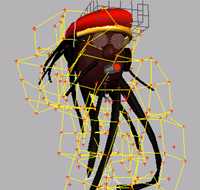 Now
right-click on the hat and spliff of the
character, and select ‘Enable’ for each
object to make HyperMatter active. These two
objects have been solidified at Sub-Object level
instead of Object-level, which means they still
take their motion from the original keyframes,
without the use of the Follow constraint. They
are effectively still under the control of MAX,
but have HyperMatter parts that can bounce around
in the ‘Real’ world.
When
all three elements are animated, the result is a
combination of complex movements that would be
virtually impossible to animate using any other
techniques, and certainly nowhere near as
quickly!
HyperMatter
enables you to add wild and crazy physical
effects to objects with such ease, that you will
now be able to explore a huge animation domain
that was previously out of reach to anyone but
skilled traditional animators.
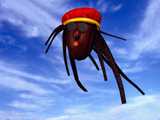
Click on the image to
download an AVI of the scene.


|