| This demo shows the
use of collisions, one of the most exciting and
challenging uses of HyperMatter. Unlike other
collision detection systems, HyperMatter’s
soft object dynamics allows much more realistic
interaction between objects in a scene. Most
software allows you to merely bounce hard objects
off each other. HyperMatter allows you to have
soft, sliding, squashing collisions between as
many objects as you like. This demo is a fairly
simple explanation of the principles behind the
process, which involves the addition of a Collide
Constraint to all the parts involved in the
collision. To create the collision in this case,
we are going to use an invisible HyperMatter
panel as a collision object, and also use fixed
object deformation for added comic effect.
Load the scene Dog and
Pan.max (115K)
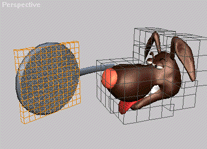
The
scene shows a dog’s head, with HyperMatter
already applied, and a keyframed frying pan,
which will swing round and hit the dog full in
the face. The frying pan has a HyperMatter block
attached to it via a Follow Constraint. The block
has also been ‘Set’ to maintain its
shape during the collision. The block has been
assigned a transparent material, so that it will
not render.
The
first thing we are going to do is apply a Collide
Constraint to both the block and the front of the
dog’s face. This will begin just before they
impact, and last until the frying pan swings back
out of the way. As collisions are very
processor-intensive, we must make sure that the
Constraint only lasts for the duration of the
collision, as the extra calculations are wasted
outside this range.
So
we bring up a pre-set part named
‘Bump’, and apply the Collide
Constraint to it, running from Frames 52 to 68.
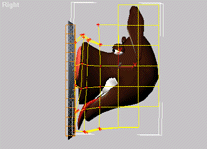
Now
we select the block object, and select the part
‘Exterior’. Now deselect all the points
except the front faces, the side that will hit
the dog. We name this part ‘Bump’ also,
although you would probably need to give the
parts more meaningful names in complicated
scenes.
We
apply a Collide Constraint to this part, and make
sure it occupies the same collision domain and
frame range as the dog’s collide part. The
default procedure for HyperMatter will be to
assign the next object a new collision domain, so
set the domain for both objects to 1.
Now
when we play the animation, we see that when the
pan should collide with the dog, it actually
passes through it, only slightly snagging the
mesh. The reason for this is because the frying
pan swings in so quickly, that the distance moved
per frame is too great for the HyperMatter engine
to evaluate the collision correctly. To fix this
we must modify the Sampling Rate.
|
The Sampling rate is
the amount of ‘Slices’ of each frame
that HyperMatter calculates; a value of 1 per
frame will make no difference. The more slices
HyperMatter checks, the more accurate it runs,
and the faster and softer your collisions can be.
To preserve maximum speed, we only need to
increase this as the collision approaches, so the
objects will be ready at the correct time. First, open
the Sampling rollout in the Substance editor, and
reset the Sampling option from Automatic to
Manual. Now we open the Track View, and bring
down the sampling track for the two objects. We
enter two keys for each object, at Frames 48 and
52. We set the second key value to 15, so that
the sampling rate increases dramatically as the
collision approaches
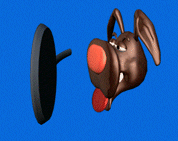
Now
when we hit Play, the collision is calculated
correctly, and the head is knocked backwards with
the impact. That’s fairly amusing, although
it would be even funnier, if the head stayed
where it was, and the face flattened out like Tom
and Jerry’s do.
We
select the part named ‘Back’ and apply
a Fix Constraint, beginning at Frame 56. This
will hold the head in position, forcing the face
to compress against it under the force if the
collision.
At
this point, we can also apply the Set Constraint
to the part ‘Front’, which contains all
the points not included in the part
‘Back’. This effectively gives us two
halves to the object, which are free to do
separate things, but still behave as a whole. The
Set Constraint will force the part to accept the
deformed state it currently holds as permanent,
at least whilst the Constraint is active, but
still allow it some freedom of movement relative
to the back of the head.
We
do want the face to pop back out again, so we
will set the Constraint to end at about Frame
125.
Now
when we play the animation, we can see that the
collision splats the face flat, and then the face
pops out, performing realistic secondary
wobbling, which would be virtually impossible to
achieve using any other animation system.


|